
Angular Component LifeCycle Hook
Angular Component LifeCycle Hook이란
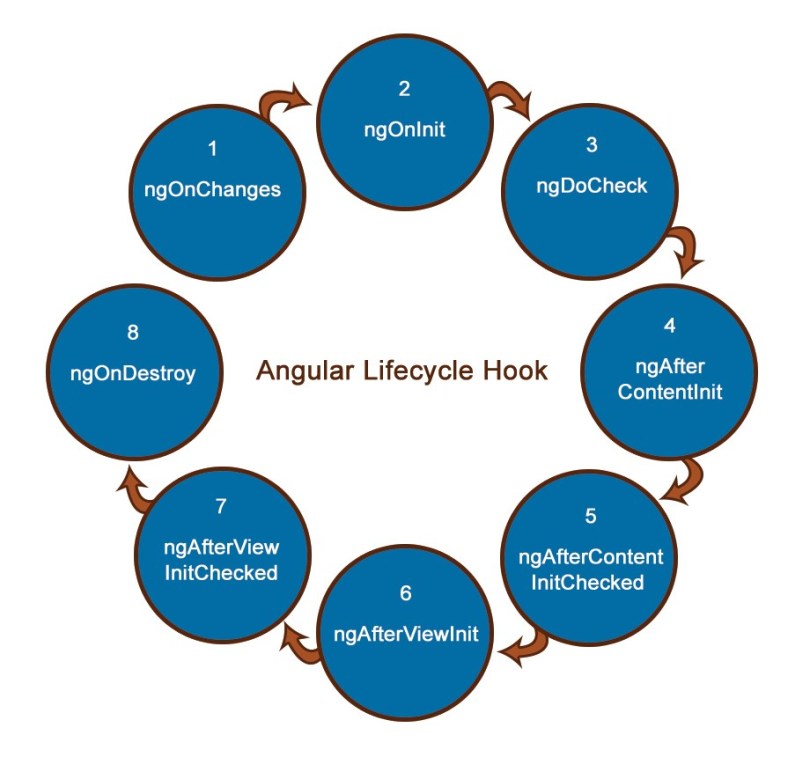
Angular의 LifeCycle Hook
각각의 LifeCycle Hook의 목적 및 호출 시점
-
constructor() : LifeCycle 이든 뭐든 가장먼저
-
ngOnInit() : 프로퍼티 초기화된 직후.
-
ngOnChanges() : 최초 초기화때, Input 프로퍼티가 변경될때 Input 데코레이터가 사용된 프로퍼티가 없으면 실행되지않음.
-
ngDoCheck() : 모든 데이터의 변경에 관여한다.
-
ngAfterContentInit() : ngContent 사용 시 자식이 초기화 된 직후.
-
ngAfterContentChecked() : ngContent를 통해 HTML을 받을때.
-
ngAfterViewInit() : 템플릿이 모두 초기화되었을때.
-
ngAfterContentChecked() : 템플릿에 바인딩된 값이 변경되었을때.
-
ngOnDestroy() : Angular가 디렉티브/컴포넌트를 파기하기 전에 하는 청소작업. 옵저버를 삭제하고 메모리 누수를 피하기 위해 이벤트 핸들러를 떼어낸다. Angular가 디렉티브/컴포넌트를 파기하기 전에 호출된다.
영구같이 코딩하는 내모습에 착찹하지만, 하나하나씩 열심해 배워나가보자.
Component가 생성되고 사라질 때까지 Component는 LifeCycle을 가지게된다. 각 LifeCycle 마다 특정한 조건을 가지는 시점이 존재하는데, 해당 시점에서, 어떠한 로직을 추가하거나, 처리해주기 위해 Component LifeCycle Hook 에대한 지식이 필요하다.
각각의 LifeCycle들은 interface 임으로 각각의 LifeCycle이 필요한 시점에 implements 해주어, 로직을 변경,처리 해주면 된다.
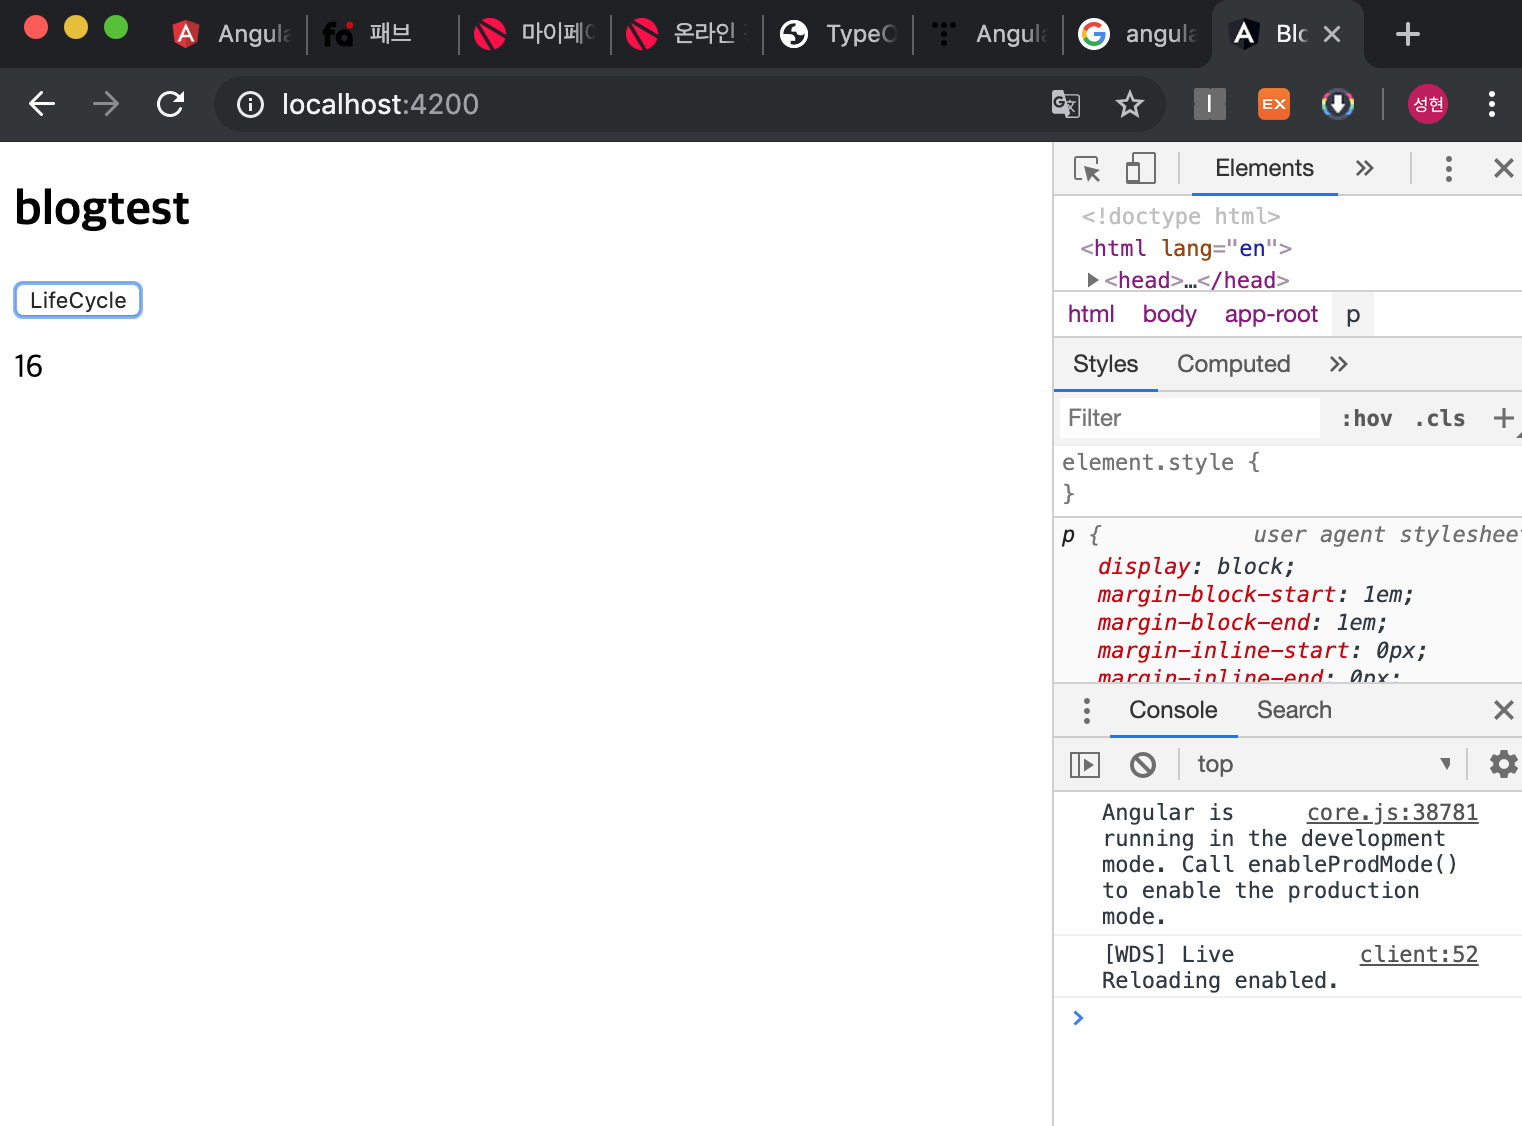
우선, 해당 시점을 하나하나 살펴보기위해, 버튼을 눌리면 숫자가 올라가는 초기 세팅을 해주자.
//app.component.ts

import { Component } from '@angular/core';

@Component({
  selector: 'app-root',
  templateUrl: './app.component.html',
  styleUrls: ['./app.component.css']
})
export class AppComponent {
  title = 'blogtest';
  num = 0;
  Plus() {
    this.num++;
  }
}
//blogtest.component.ts

import {Component, Input, OnInit} from '@angular/core';

@Component({
  selector: 'app-blogtest',
  templateUrl: './blogtest.component.html',
  styleUrls: ['./blogtest.component.css']
})
export class BlogtestComponent implements OnInit {
  @Input() num;
  constructor() { }

  ngOnInit() {
  }

}
ngOnInit
위와 같이 세팅한 후,
///blogtest.component.ts

import {Component, Input, OnInit} from '@angular/core';

@Component({
  selector: 'app-blogtest',
  templateUrl: './blogtest.component.html',
  styleUrls: ['./blogtest.component.css']
})
export class BlogtestComponent implements OnInit {
  @Input() num;
  constructor() {
    console.log('constructor', this.num);
  }

  ngOnInit() {
    console.log('ngOnInit()', this.num);
  }

}
Interface 상으로 구현되어져 있는 OnInit 을 implement하고 constructor 와 ngOnInit에 console을 찍어줘 보자.
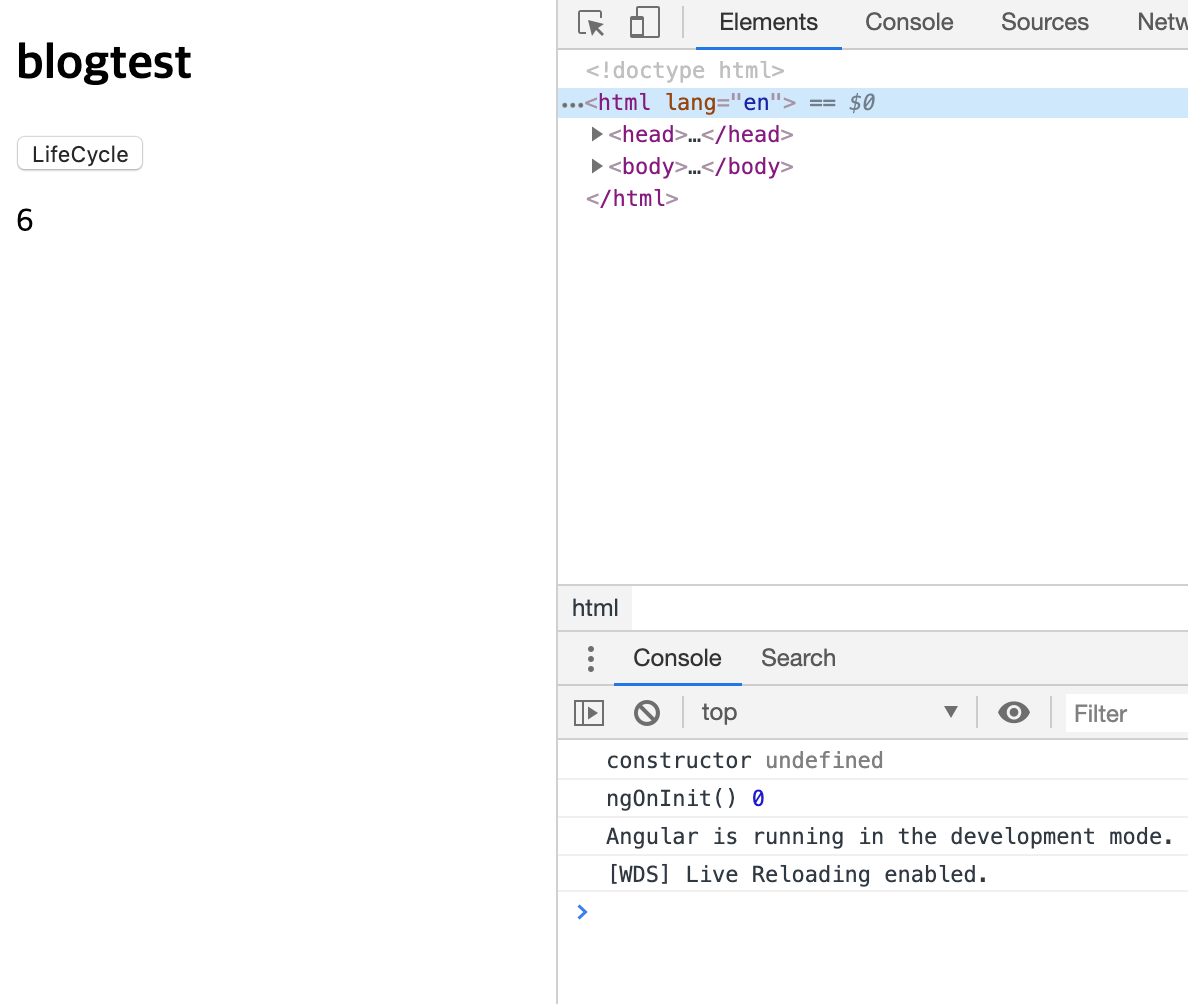
그림과 같이 constructor 상에서는 undefined, ngOnInit에서 0으로 초기화 된것을 볼 수 있다.
@Input() 프로퍼티는 ngOnInit 내에서 접근 가능하지만 constructor에서는 undefined를 반환하는 방식으로 디자인되어 있다.
조금 난해한 부분이다.. 다음 포스팅에서 constructor VS ngOnInit을 다루어 본다.. (ES6의 constructor메소드 (여기서는 타입스크립트)는 Angular의 기능이 아니라 클래스 자체의 기능이다. constructor가 호출되는 시점은 Angular의 제어 바깥에 있다. 즉, Angular가 컴포넌트를 초기화 했는지 알기에는 적합하지 않은 위치다.)
여하튼, 위쪽에서 명시한 ngOnInit의 기능이 수행되는 시점을 확인했다.
ngOnChanges,ngDoCheck
이번에는, ngOnChanges() 와 ngDoCheck()를 implements 하여 기능 시점을 확인해 보자.
//blogtest.component.ts

import {Component, DoCheck, Input, OnChanges, OnInit} from '@angular/core';

@Component({
  selector: 'app-blogtest',
  templateUrl: './blogtest.component.html',
  styleUrls: ['./blogtest.component.css']
})
export class BlogtestComponent implements OnInit, OnChanges, DoCheck {
  @Input() num;
  constructor() {
    console.log('constructor', this.num);
  }

  ngOnInit() {
    console.log('ngOnInit()', this.num);
  }

  ngOnChanges() {
    console.log('ngOnChanges()', this.num);
  }

  ngDoCheck() {
    console.log('ngDoCheck()', this.num);
  }
}
위와 같이 implements 해주고, 실행시켜보자.
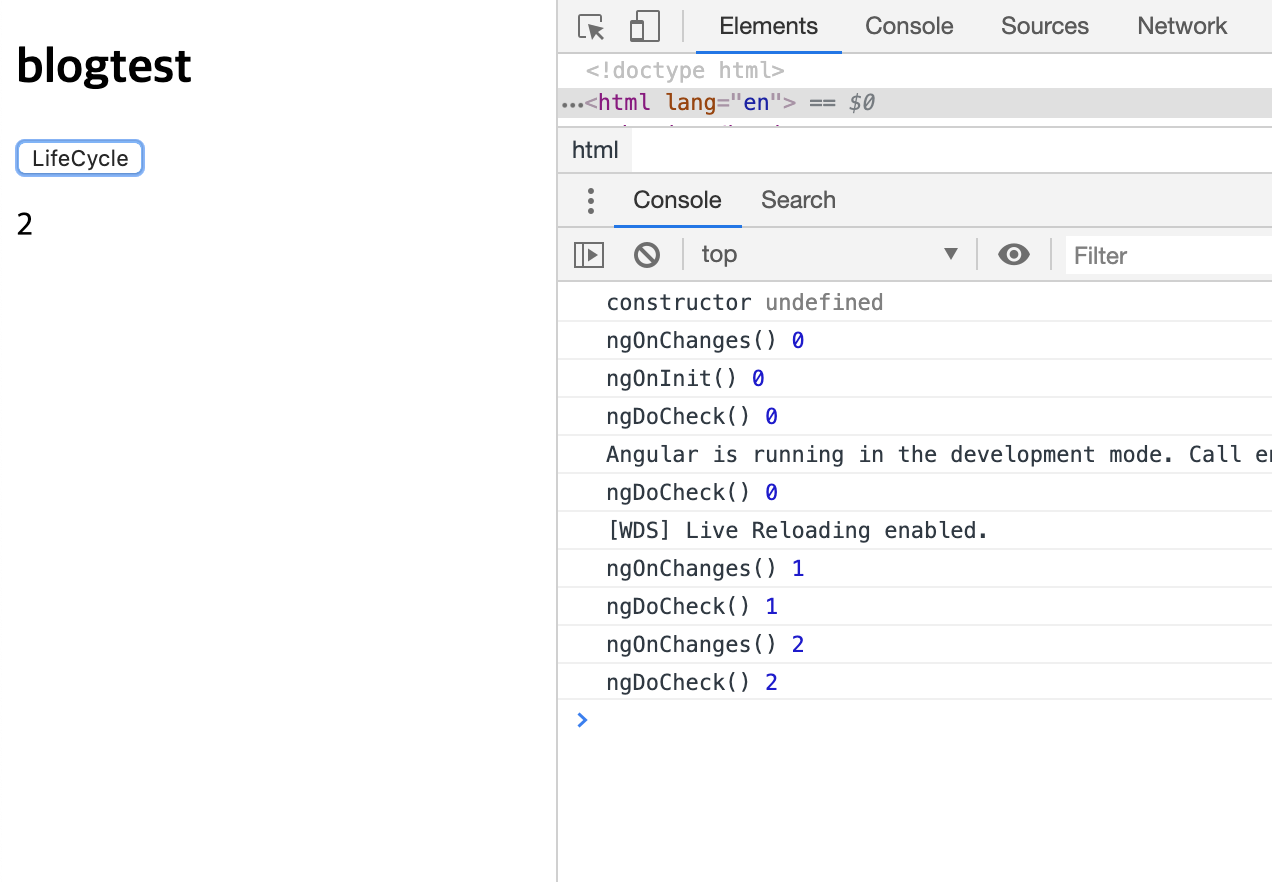
위의 lifecycle 순서, 각각의 기능 시점에 정상적으로 작동함을 확인 할 수 있다.
그런데, 여기서 ngOnChanges 와 ngDoCheck의 큰 차이점은,
//app.component.ts

import { Component } from '@angular/core';

@Component({
  selector: 'app-root',
  templateUrl: './app.component.html',
  styleUrls: ['./app.component.css']
})
export class AppComponent {
  title = 'blogtest';
  obj = {
    num: 0
  };

  Plus() {
    this.obj.num++;
  }
}
//blogtest.component.ts

import {Component, DoCheck, Input, OnChanges, OnInit} from '@angular/core';

@Component({
  selector: 'app-blogtest',
  templateUrl: './blogtest.component.html',
  styleUrls: ['./blogtest.component.css']
})
export class BlogtestComponent implements OnInit, OnChanges, DoCheck {
  @Input() obj;

  constructor() {
    console.log('constructor', this.obj);
  }

  ngOnInit() {
    console.log('ngOnInit()', this.obj);
  }

  ngOnChanges() {
    console.log('ngOnChanges()', this.obj);
  }

  ngDoCheck() {
    console.log('ngDoCheck()', this.obj);
  }
}
//app.component.html

<h2></h2>
<p><button (click)="Plus()">LifeCycle</button></p>
<app-blogtest [obj]="obj"></app-blogtest>
//blogtest.component.html

<p></p>
Input property를 객체로 바꾸었을때, 초기화 단계까지는 같고,
위의 Input property가 어떤 숫자값으로 주어 졌을때 가르키는 객체 자체가 변할때 ngOnChanges와 ngDoCheck가 같이 불리고,
위와같이 가르키는 객체 자체가 변하지 않고 그 안의 property가 변할때 ngDoCheck는 그 변화를 감지해준다.
나머지 다양한 lifecycle들도 해당 시점에 console을 찍어 가며 확인하며 학습하면 된다.
마무리
여하튼, 필요한 시점에 로직을 변경하고 처리할때 Life Cycle Hook의 이해는 필수적으로 보인다…
댓글남기기